
 First you create a line dwg. of your room. Tape down an image, sketch up dwg, or hand dwg, with trace or marker paper on top leaving an overhang to use for a colour test strip.
Sketch the space, replacing and deleting furniture and styles, accessories and arch. details. I used the large wall for art, instead of a window, and created coffered ceilings in my sketch. This is a great method for renovations, as you can use "as is" pictures for the base image.


Add your first layer of colour...don't pay attention if it doesn't look just right. Use a tester sheet under the bottom trace paper flap, and remember to put aside the markers you use, so you don't have to search them out again. The things closest to you should have the most detail, things farther away, much less.
I have drawn in my chandelier, and have used a grey on the back walls as a starter point for wall colour.

Add lighting and shadows, thinking of the light sources in the space.

Texture is the key; do it with these criss cross patterns for linen, dots for bucle's, and raise the dots off the edges of fabrics that are really nubbly.

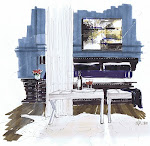
 The lighting effects are emphasized by using swipes of a buttery yellow tria pen. At this stage, I apply dots and criss cross patterns to mimic texture, apply shadows under furniture, and a dark line separating for the item and it's shadow for definition.
One of the biggest things is to leave white space...even if the items are not white. It's the break we need to make order of the overall drawing, and leaving more on the surface of items, creates lighting interest.
Typically, the tops of items will be lighter than the sides. Using two swipes of tria instead of one where light is not cast creates two values of light, adding interest and movement.

Here is the inspiration for the space...the Tissage chandelier.
I like the contrast of the rust fabrics in the space with the Forest/lime green lampshades. The panelling in grey sets the tone for the furniture to pop.
Tape the white paper to the back of your dwg and scan, or reduce by 30% on a colour photocopier to get a finer detail look.

The completed dwg. Don't forget to sign it...it's nice to see how you progress over the years.

14 comments:
Move over Eddie Ross but in the world of rendering! You are amazing! It's beautiful what you did. I have to go to Alexander street next week, definitely. Let's meet!
Congratulations on your 125th post!
Great rendering!
At every showhouse in Atlanta (and we have a lot of them, to my delight) they have a magazine with renderings of each room. Some of the renderings are AWFUL - they look like a 3 year old did the drawings. Other renderings are lovely. These renderings fall into the lovely category!
I think this is a beautiful chandelier. Although, every time I see it, I can't help but think og those fancy, elegant roasts with the little white things on the tips.
Wonderful rendering! As an artist, I truly appreciate what goes into this. I know it looks easy to outsiders, but it takes practice to make things perfect.
Congrats on your 125th post too. Awesome!
I just realized it's only my 123rd post...LOL.
Thanks for the comments you guys!
I wish we had showhomes like other cities do TTI...Maria...maybe something to think about?
Thanks for visiting Patricia...love your work...your know that :)
Wow, I'm blown away!! So glad you stopped in with me so I could find you. Amazing, amazing rendering skills. Sooooo jealous. Never had the talent. I'll be back as well!
We do the same trick at the studio with the tracing paper. It works like magic. I also have found that if you scan the tracing paper with a cream colour paper in behind it adds lots of warm to the sketches.
C O N G R A T U L A T I O N S on your 125 entry.
I know for a fact that is an achievement in its own.
wow =amazing - I'm going to have to try this !!! I've heard about tracing art work before, but never seen it done. thanks!! you really can draw.
Love your sketch - wonderful!
-Lana
Love the fact that you enjoy rendering so much, I know many people dont and consider it the "ugly" part of the job. they are truly beautiful and reflect how much you enjoy doing this.
AMazing.
Michelle.....all I can say is that your renderings are absolutely superb!!!!!! They are truly a work of creative genius!!!! I love your technique and the touches or orange and the beautiful chandelier. I just want to step into this room. Keep it up, you have a true gift.
Michelle, I love to see how others approach the rendering process. You are so kind to let us into your head while you draw. I love the rendering your style is wonderful!
Michelle--Thank you for your comments over at my blog. You have a very keen eye and indeed, indentified the spot! Haha!
I've been drooling over your blog for the past 20 minutes or so. I feel as though I've visited before...but somehow, I'm not sure how, you fell off my radar. I can tell you that certainly won't happen again. There is so much to learn from your drawings and design skills!
I'm leaving a comment on this post because, like the girl in the blind melon video you reference, I'm surprised and amused that we created such similar posts...only my results weren't nearly as polished as yours :)
http://www.anopensketchbook.com/2009/09/working-backwards.html
Thanks for sharing!
This is amazing! Thank you so very much for sharing your process! I'm dragging out my Chartpaks and Prismacolors this afternoon! Haven't really played with them since design school. :)
Post a Comment