

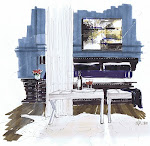
While we finish up the first video, I thought it would be fun to get limbered up doing a practice rendering…I’ll call these drawings the “Colouring Book”. Print out the first drawing (doesn’t have to be more than 5x7), tape a piece of trace or rag paper on top, use a fine liner (.05 or .03) to sketch the drawing, apply gray shadows, then colour, darker shadows, finish with fine liner texture and remember some lighting effects. You can use mine for reference if you like, but try using your own colours and design elements like the nail heads, art, rug, etc. This will be our first drawing, so give it a go, keep it as your “before” and date it, because it’s rewarding to look at your progress. I’d love to see some of them, so please…email me your finished rendering! (I would never post them without permission)


Colouring Book (Blue Bedroom)
Original art, Interior Design and Rendering by Michelle Morelan Design, 2010
<<<<<<<<<<<<< . >>>>>>>>>>>>>>
Materials List:
You can order these online, but a visit to the art store is great to get the juices flowing; go to a type which has a large selection of canvases, as it will most likely have these supplies; not Michaels…they only carry Prismacolour markers.


A tip on markers…a good range of grays (warms and cools) and an architectural pack is a great way to start your collection. Purchase what you think you need and use in your designs…like red, yellow (fireplace flames), greens and browns for landscape and colours of wood furniture. Don’t go to crazy buying vibrant colours at first, as they are used sparingly.
Investment in initial materials? About $200 gets you a nice supply. Markers are about 5 bucks each.

15 comments:
This is so exciting Michelle! I did a little work with markers but nothing close to you! Your renderings are absolutely beatiful. Do you have more details when will this start?
I think you need to sell the kit for starters and make some profit - After all you are recommending products you believe in and you have use in the past. Just a thought :)
Yes, LB, will post the first one at the end of the month.
I am so excited for this Michelle! I need to go find a good art store in ATL! You have a God given gift for what you do...may He gave me a little!
xx
You make it seem so easy! I'll be looking forward to following along. No time (or $) at present for the supplies, but I'll hope to pick something up by osmosis. You really are SO talented!
I'm looking forward to participating in the rendering lessons. I'm wondering what is the purpose of the glass?
Marion
mle@fuse.net
Hi Marion...the purpose of the glass is to light it from below with a lamp for tracing your drawing. Then, I light it from above for the colour...it's a nice smooth surface for the markers as well.I'm going to show the drawing set up in my first video.
Very Best,
Michelle
Michelle, I love your renderings so much and cannot wait to see more of your wonderful designs.
Karena
Art by Karena
I agree with Ivan, Michelle... if you have the ability to offer marker-kits to people interested in taking your on-line courses, you should definitely do it!!
This looks like so much fun! I don't know if I'll fully participate, but I'll definitely drop in from time-to-time to see a little of what you're sharing. Although... I DO find that this post has me thinking about my next trip to DeSerres and searching out for the markers you've suggested!
I'm sorry to hear that you won't be able to join us at our Brunch - but a trip with your husband sounds much more fun!! We'll have to make plans for another time. :-)
Victoria
How beautiful! I am so glad Brooke sent me over here! How long do the drawings take you? You are so talented!
Hi PLife,
thanks! they take about 4 hours, some less some more. Depends on the subject and details.
Thanks for stopping by!
Michelle
Hi Michelle,
This is a good idea! Michelle, you are so talented! I came over from Brooke's blog where I saw your beatiful drawings of her home! SUPER!!
xx
Greet
Love, love, love your work!!! Adding you to my bloglist for daily following.
Love, love, love your work! I discovered you through Velvet & Linens and will be adding you to my bloglist for frequent visits.
Keep it coming!
Thank you Michelle for sharing your knowledge and I am sure it will be a great success. Can't wait to see the project start.
Post a Comment