
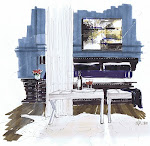
Yellow and Blue Office- Finished Rendering, Michelle Morelan, 2010
Welcome to the first in my video series- #1 Yellow and Blue Office.
Over the last couple of years, there has been interest in me teaching what I do with architectural markers. I’ve always said that anyone can do it, and there are techniques…so here’s the formula that I use typically for un-built spaces. Instead of a computer model, you can also use a photo, replacing and deleting items. I call this the substrate, and it’s the basis for your perspective and rendering. Of course, there are kinds of drawings for ID, from napkin sketches to finished watercolours…
Please bare with me, as this is a learning experience for us, and I had to let some control go just to finish this first video…I knew nothing about the filming process, and it’s more difficult than I thought.
This video is the demo/prototype version for building the series, and I am excited to share it with you. Please, be nice, it took allot for me to put myself out there, and like many of us, I cringed at the inflection of my voice, or a simple hand gesture. My need to share some of the rendering skills I’ve gained, outweighs the fear.
I’m excited…and thanks to all of you for the emails…let’s see how this goes :)
Best, Michelle
#1 Yellow and Blue Office from Schematic Life on Vimeo.
***
Print these PDF renderings from my website to participate in the video tutorial


Materials used in this rendering:
- Light table set up (glass, lamp and heavy books will do). If you don’t have piece of glass, consider the “as is” bin at Ikea for a glass door or small table top for one of their cheap end tables; just make sure it’s long enough. Always use tempered glass with a finished edge!
- Paper: both ledger size plain paper and archival rag paper- Bienfang Graphics 360- 100% rag translucent marker paper (this is like tracing paper, but it doesn’t bleed, is thicker and is able to handle the marker manipulation) these sizes are approximate, and you can work smaller or larger if you like. I have a scanner that scans up to ledger size (11x17). Just ask the clerk for marker paper- archival.
- Drafting tape; it’s less sticky than regular masking tape, but that will do too…just put it on your pants or skin first to get most of the stickiness off.
- Black fine liner pens: Copic Multiliner SP .03, and .05, Staedtler pigment liner .1 (an assorted pack of thicknesses is a better deal)
- Artist pen by Faber-Castell in the B thickness; this is a paint brush type tip- a multipack of greys and a multipack of colour is a better deal, but for this dwg, I used 199 (dark gray), 272 (light gray),174 (green), and 247 (blue). There was a quick use of a thicker 180 (raw umber) for the desk, but I went over it with the darker brown to fix it; still this is a useful thickness and colour, and will be used in future dwgs, so I would recommend it
- Graphic pen 3000 duo tip by Staedtler Mars in 55 (green). These are some of my favourite paint pens, because they pool.
- Tombo ABt paint pen 491 (glass coloured blue); its duo tipped
- Copic Markers in W5 (Warm Gray #5), E49 (Dark Brown), 110 (Special Black), E43 (Dull Ivory)
- Touch Markers CG5 (Cool Gray)
- Prismacolour 96 (Blondwood)
- Letraset Tria Marker in 120T (Medium Yellow)
- A gold roller ball gel type pen
- A dual tipped black Sharpie
- Signo pigment ink in UM-153 White

21 comments:
Just wonderful! Way to go Michelle!
Love your voice, and your crystal clear English for us all non-natives!
Keep on, please!
Anastassis
Very nice drawings and I like blue and yellow together..yvonne
Michelle
Fabulous tutorial! Thanks for your comments on my blog- I always look forward to hearing from you!
You have a great week too!
xx,
Michelle
Michelle, this is fantastic!! I'm going to have to give your techniques a try ;-)
It's been good to see you over at DesignTies... and yes, we definitely need to make lunch plans!
Victoria
Michelle,
I loved seeing your process....I am going to give it a try. I enjoyed too seeing a bit of your world!
Blessings...
Hooray! I'm going to try it this week!
I'm in awe. Very well done video. How you you speed it up?
This is so fun! Your production and narration are spot on. I can't wait to try my hand at making my own rendering. Thank you so much for posting.
That was so fun to watch! Congratulations- I would've never guessed this was your first video!
That was so fun to watch :-) You make it all look so easy!! Wish I'd seen this video before I had to do the colour rendering for my drawing class -- it would have saved me a ton of time!!
Kelly
Michelle, this video was so interesting, you make drawing look so easy and yet it is a very difficult process. To start...your hands are so steady and it is obvious you have so much talent. Love your voice and your boys did a marvelous job. Brava.
Complimenti Michelle!
Un grazie dall'Italia.
Ciao ciao.
A presto
Giorgio
You're amazing, Michelle! Well done.
Thanks all!! Terry...my sons used Final Cut Pro and Pro Tools. It's shot with a Sony HVX.
Fantastic!!!
The video was really nicely done - Love the voice - so sexy!
I can wait to learn more!
I have been waiting to try this over the weekend so I will let you know how it goes! You are so very talented I can't even start. Your steady hand shows your experience and talent and your calm voice is so encouraging. Thank you for doing this! xo
We just finished watching. How generous of you to share. I'd love to learn, so thanks for this treat!
It was fun to hear your voice, too!
Michelle
Thank you for your generosity in sharing your wealth of knowledge and talent....
I enjoyed the tutorial immensely and look forward to more of the same.
Julie
These tutorials are FABULOUS!!
I've always wondered how these drawings are done so exact to the room and now I know. I cannot wait to try this in my own home. And thank you so much for the materials list, without it I wouldn't know where to begin.
I hope to see more of these. Thank you!
Tamra
Hi Michelle! Just came across your blog and am already enamored with these video posts! I'm in the second term on a B.I.D. program and am taking my first rendering class, I think these will be very helpful. I was wondering if you might share with us how you store your 'toolbox' of art supplies as you call it. I'm building up my collection slowly but storage is a bit tricky!
Thanks so much,
Your newest follower.
Thank you soooo much for sharing this, Michelle - your style is utterly gorgeous, and that was one seriously inspiring tutorial!
Post a Comment